
Essential Tips
Product Care and Cleaning
In order to gain lasting benefit from you Focus Floors product:
- Focus Flooring Laminate is extremely hygienic and very easy to look after
- For everyday cleaning purposes, it is sufficient to vacuum with brushes or sweep the floor with a soft broom
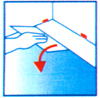
- Footmarks and tough dirt can be readily cleaned off with a damp cloth. However, only use a well wrung out-almost dry cloth. Under no circumstances should the floor be cleaned with a soaking wet cloth or mop.
- Any Windowlean and water solution, in a spray bottle may be used for cleaning purposes. However, on no account should abrasive cleaning agents such as waxes, oils or polishes be applied to the laminate flooring.
- More serious contamination and stubborn stains can be easily removed with acetone or other alcohol based solvent, however it is VERY important that this is only used spot wise.
- To prevent damage by dirt, we suggest that you place doormats at entrance doors. To prevent scratching you should fit felt gliders to the feet of furniture. Rolling furniture should be fitted with rubber chair casters.
- Avoid dragging heavy furniture across floors as this may cause scratch marks.
The formation gaps in the flooring are to be expected in the event of failure to maintain the recommended humidity.
Warranty on our Laminated Flooring
This quality Laminated flooring has a 20 year Warranty to not fade, wear through or stain.
This warranty applies only to the original purchaser and proof of purchase is required for all claims . The warranty is for replacement or refund of the laminated materials only ,no labor. The warranties does not cover chipping (laminate will chip if sharp objects are dropped on it or pulled across the floor) warning (laminate will warp if excessive cleaning with water it gets into the boards and causes the boards to peck and warp) or bridging ( which is caused by insufficient expansions spacing )We will not consider any claims for these problems. Claims for wear must show a minimum dime size area.
The warranties are pro-rated on the amount of time the floors have been installed for.
Product Installation Process
Step 1: PreparationLeave the planks to acclimatise for 48 hours depending on the local temperature and air humidity. The ideal room temperature is approximately 22° C and the ideal air humidity is approximately 55% |
 |
|
Step 2: Subfloor and SurfaceMake sure the floor is level with not more than a 3mm gap in a 1.5 metre level. Clean and smooth the subfloor, remove any grease; install the damp-proof layer, check the laminate planks for any damage. |
 |
|
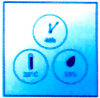
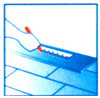
Step 3: The First RowPlace a plank in the corner with the tongue side turned towards the wall. Roll the front edge of the second plank into the first plank by using the tongue-in-groove method and continue until the first row is ready. Remember that 8 – 10mm expansion joint should be allowed for around the perimeter of the area. |
 |
|
Step 4: Completing the FloorUsing the off-cut of the first row, start on the second row by placing the short ends of the planks together to form the second row. |
 |
|
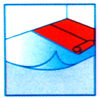
| Carefully lifting the second row, place it firmly against the first row at an angle of 30 degrees and press downwards at the same time pushing the second row firmly into the first. |  |
|
| Make sure the joints have closed or are firmly together throughout the process. | 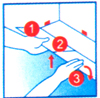 |
|
Step 5: The Final RowOn the final row cut the planks lengthwise remembering to leave an 8 – 10mm expansion gap. |
 |
|
Step 6: Enjoy the FloorYou must wait 24 hours after the installation before you can enjoy your new flooring. |
 |